
Table of Contents
- Why Restaurants Are Leaving Gloria Food
- What You Need Before You Start
- Step 1 — Set Up WordPress and WooCommerce
- Step 2 — Rebuild Your Menu in WooCommerce
- Step 3 — Configure Online Ordering and Delivery
- Step 4 — Set Up Payment Gateways
- Step 5 — Handle Your Domain and DNS
- Step 6 — Go Live and Test Everything
- Common Problems and How to Fix Them
- Gloria Food vs WooCommerce — Quick Comparison
1. Why Restaurants Are Leaving Gloria Food
Gloria Food was a popular choice for small restaurants when it launched — it was free, quick to set up, and had a decent ordering interface. But over time, restaurant owners started running into the same walls.
The platform was acquired by Oracle in 2021, and since then the free tier has become increasingly limited. Features that used to be free now require paid plans. Customization is almost nonexistent — you get what Gloria Food gives you, and that’s it. Your menu lives on their servers, your customer data is theirs, and if they change their pricing or shut down a feature, you have no control.
The restaurants I worked with in Denmark made the switch for a simple reason: they wanted to own their online ordering system. With WooCommerce, your menu, your customer data, your orders — everything lives on your own WordPress site. You control the design, the fees, the integrations, and the customer experience.
Here’s what you actually gain by switching:
- Full control over your menu layout and design
- No platform commission on orders (just payment gateway fees)
- Your own customer database — build loyalty programs, send emails, run promotions
- Integration with any payment provider you choose
- A real website, not just a Gloria Food subdomain
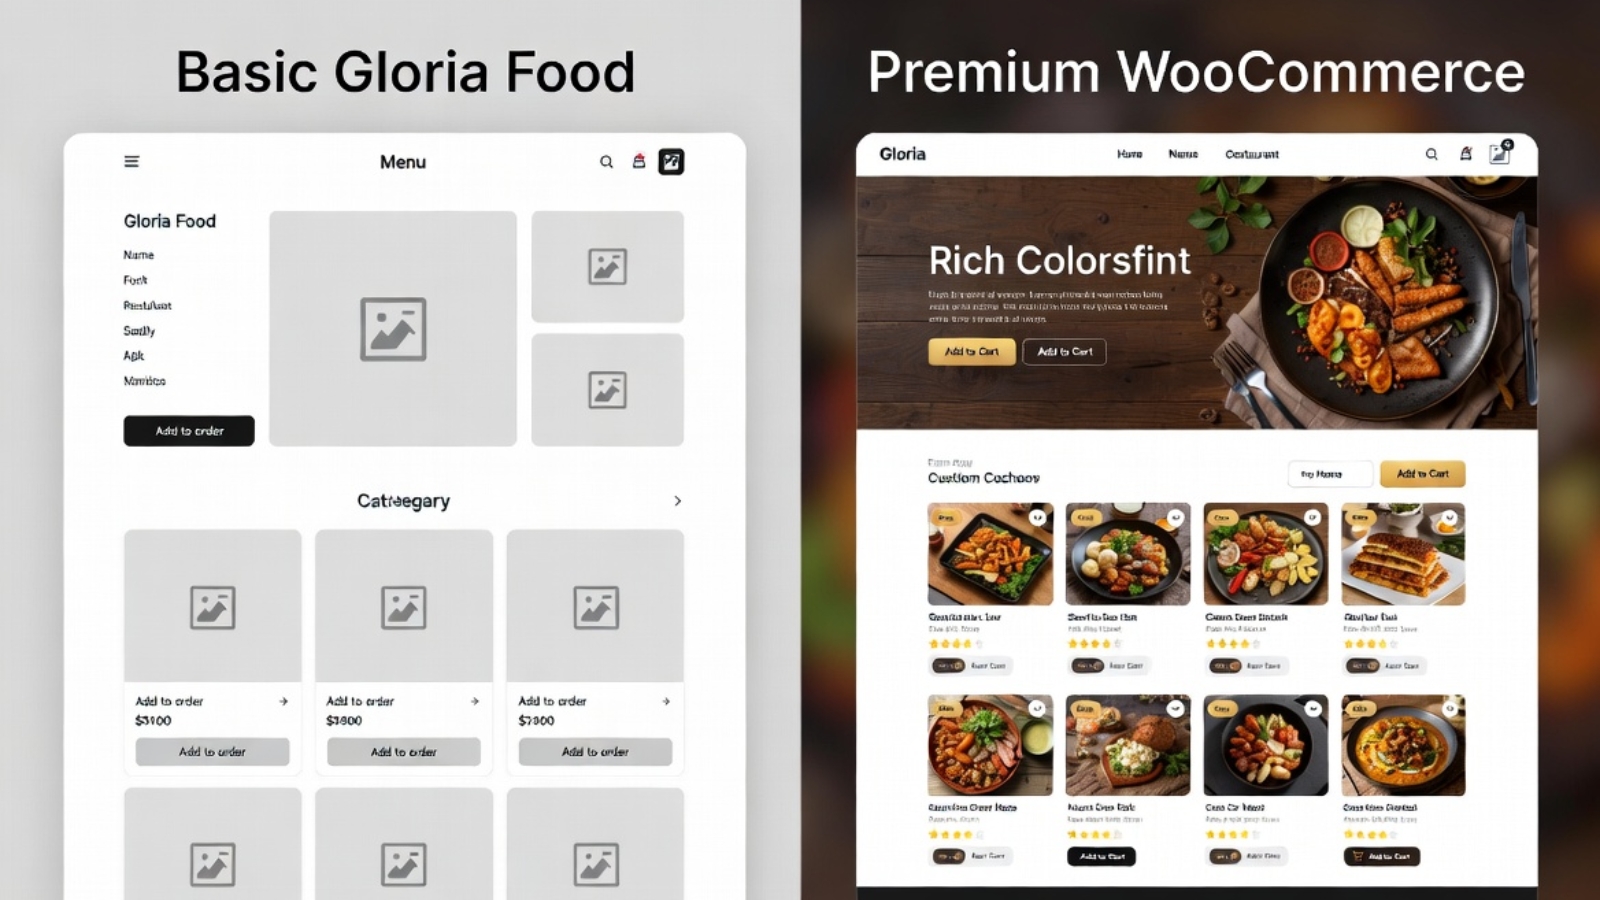
📸 Image 1 Alt text: Gloria Food restaurant ordering page vs WooCommerce restaurant website side by side comparison AI Prompt: Split-screen comparison image showing a basic Gloria Food ordering page on the left (simple white layout, limited branding) versus a fully designed WooCommerce restaurant website on the right (custom colors, logo, beautiful food photos, add to cart buttons). Clean flat design, no people.
2. What You Need Before You Start
Before you touch anything, gather these:
- Your current Gloria Food menu — take screenshots or export if possible. You’ll be rebuilding this in WooCommerce, so having it documented saves significant time.
- Your domain name login — you’ll need to update DNS records. Know which registrar controls your domain (GoDaddy, Namecheap, or in the case of Danish restaurants, often Punkt.um or One.com).
- WordPress hosting — you need a hosting account where WordPress will be installed. Hostinger, SiteGround, or any cPanel host works fine.
- A list of your payment methods — do you want to accept card online? Cash on delivery? Specific local payment gateways?
- Your restaurant’s photos — logo, food photos, interior shots. These will make your WooCommerce site look significantly better than Gloria Food ever did.
✅ Pro Tip: Before migrating, keep Gloria Food running in parallel. Don’t shut it down until your WooCommerce site is fully tested and live. Run both simultaneously for at least one week.
3. Step 1 — Set Up WordPress and WooCommerce
Install WordPress
Most hosting providers have a one-click WordPress installer. In Hostinger it’s under hPanel → Websites → Auto Installer. In SiteGround it’s under Site Tools → WordPress installer. Run it, set your admin username and password, and you’re in.
Install WooCommerce
Once inside WordPress:
- Go to Plugins → Add New
- Search for WooCommerce
- Click Install Now → then Activate
- WooCommerce will run a setup wizard — go through it and select:
- Your store location and currency
- What you’re selling (select Physical products for food items)
- Payment methods (you can add more later)
- Shipping (for delivery) or local pickup
Install a Restaurant-Friendly Theme
Your theme controls how your site looks. For restaurants, these free themes work well:
- Astra — lightweight, fast, works with any page builder
- Kadence — excellent WooCommerce support out of the box
- OceanWP — solid free option with restaurant demo sites
If you want a premium look without paying for a theme, use Astra free + Elementor free. This combination gives you full visual control.
4. Step 2 — Rebuild Your Menu in WooCommerce
This is the most time-consuming part, but it’s also where you gain the most control. Every menu item becomes a WooCommerce product.
Set Up Product Categories First
Before adding items, create your menu categories. Go to Products → Categories and add categories that match your menu sections:
- Starters / Appetizers
- Pizzas
- Burgers
- Pasta
- Salads
- Drinks
- Desserts
Add Menu Items as Products
For each menu item, go to Products → Add New:
- Product Name — e.g. “Pepperoni Pizza”
- Description — short description of the dish (ingredients, allergens)
- Product Image — upload a food photo. This is where WooCommerce destroys Gloria Food — real photos on every item
- Price — set the regular price
- Product Category — assign to the correct menu section
- Product Type — set to Simple Product for standard items
Handling Variations (Size, Extras, Toppings)
This is where WooCommerce gets powerful. For items that come in different sizes or with optional extras, use Variable Products:
- In the Product Data panel, change Product Type to Variable product
- Go to the Attributes tab
- Add attribute: Size → values: Small | Medium | Large
- Check “Used for variations”
- Go to Variations tab → Generate All Variations
- Set individual prices for each variation
For extras and add-ons (extra cheese, extra sauce), install the free plugin WooCommerce Product Add-Ons or use Flexible Checkout Fields.
⚠️ Watch Out: If you have a large menu (50+ items), consider using a bulk product import via CSV. Export your Gloria Food menu data, format it as a WooCommerce-compatible CSV, and import via Products → Import. This can save hours of manual entry.
5. Step 3 — Configure Online Ordering and Delivery
WooCommerce handles ordering natively, but for a restaurant you need to fine-tune a few things.
Install a Restaurant Ordering Plugin
Standard WooCommerce is built for physical product shipping, not food delivery. Install one of these to add restaurant-specific features:
- Orderable (free tier) — adds time slots, ASAP ordering, minimum order amounts, and a beautiful checkout flow built for restaurants
- WooCommerce Restaurant Ordering — dedicated plugin for food businesses, adds category-based ordering page
Set Up Delivery Zones
In WooCommerce → Settings → Shipping:
- Add a Shipping Zone for your delivery area (e.g. Copenhagen City Center)
- Set a flat delivery fee or free delivery above a minimum order
- Add a Local Pickup option for customers collecting in person
Set Ordering Hours
With Orderable or similar plugins, you can restrict ordering to your opening hours. This prevents customers from placing orders at 3am when you’re closed.
Minimum Order Amount
Go to WooCommerce → Settings → Minimum Order plugin (or Orderable settings) and set a minimum order value for delivery..
6. Step 4 — Set Up Payment Gateways
This is where Denmark-specific and regional requirements matter. WooCommerce supports almost every payment provider through free plugins.
For Danish Restaurants specifically:
- MobilePay — install MobilePay WooCommerce plugin (this is essential for Danish customers, almost everyone pays with MobilePay)
- Stripe — handles Visa, Mastercard, and international cards
- Cash on Delivery — enable this in WooCommerce → Settings → Payments for cash collection on delivery
For General International Restaurants:
- Stripe — best all-around choice
- PayPal — widely trusted
- Square — good for businesses already using Square POS
Install Stripe for WooCommerce:
- Go to Plugins → Add New → search “WooCommerce Stripe Payment Gateway”
- Install and activate
- Go to WooCommerce → Settings → Payments → Stripe
- Enter your Stripe API keys (from your Stripe dashboard)
- Enable test mode first, complete a test order, then switch to live
✅ Pro Tip: Always enable at least two payment methods. If Stripe has an outage or a customer’s card fails, they need a fallback option or you lose that order.
7. Step 5 — Handle Your Domain and DNS
This is the step that trips up most people — and it’s where I spent significant time with my Danish restaurant clients, particularly with the Danish registrar Punkt.um.
Understanding What Needs to Change
Your domain is currently pointed to Gloria Food’s servers. To make it point to your new WordPress site, you need to update the DNS records at your domain registrar.
Find Your New Hosting IP Address
In your hosting control panel (Hostinger hPanel, SiteGround, etc.), find your hosting account’s IP address or nameservers. It’ll look like:
- IP: 185.XXX.XXX.XXX
- Or nameservers: ns1.hostinger.com / ns2.hostinger.com
Update DNS at Your Registrar
Log in to wherever your domain is registered:
If using nameservers (recommended):
- Find the nameserver settings at your registrar
- Replace the current nameservers (which point to Gloria Food or their host) with your new hosting nameservers
- Save
If updating A records only:
- Find the DNS management section
- Edit the A record for @ (root domain) — change the IP to your new hosting IP
- Edit the A record for www — same new IP
- Save
⏱ DNS Propagation
DNS changes take 15 minutes to 48 hours to fully propagate worldwide. During this time your site may be inaccessible or flipping between old and new. This is normal. You can check propagation status at whatsmydns.net.
⚠️ Watch Out — Punkt.um Specific (Danish registrar): Punkt.um’s DNS interface is in Danish and can be confusing. The nameserver field is under “Navneservere” and the A record section is under “DNS-zoner”. If you change nameservers at Punkt.um, it can take up to 48 hours — longer than most registrars. Don’t panic if it takes a full day.
8. Step 6 — Go Live and Test Everything
Before announcing the switch to your customers, run through this complete checklist:
Ordering Test
- Place a test order for delivery — go through the full checkout flow
- Place a test order for local pickup
- Test with each payment method you’ve enabled
- Check that the order confirmation email arrives and looks correct
- Log in to WooCommerce → Orders and confirm the test order appears
Menu Check
- Every item has a photo
- Prices match your Gloria Food menu exactly
- Variations (sizes, extras) work correctly
- Categories display in the right order
Mobile Check
- Browse the menu on an iPhone (Safari)
- Add items to cart on mobile
- Complete checkout on mobile — this is where most customers will order from
Speed Check
- Run your site through Google PageSpeed Insights
- Target a score above 70 on mobile
- If slow: install LiteSpeed Cache (if on Hostinger) or W3 Total Cache
Turn Off Gloria Food Once everything above passes, log in to Gloria Food and either:
- Set your store to Closed permanently
- Or delete your Gloria Food account if you no longer need it
Redirect your old Gloria Food ordering URL to your new WooCommerce ordering page if possible.
9. Common Problems and How to Fix Them
Problem: Customers can’t find the ordering page Fix: Add a prominent “Order Now” button to your homepage hero and your navigation menu. Make it a different color from everything else on the page.
Problem: MobilePay isn’t processing Fix: Make sure you’ve completed MobilePay’s business verification. The plugin won’t process live payments until your MobilePay business account is fully verified.
Problem: Orders aren’t sending email notifications Fix: WooCommerce uses WordPress’s built-in mail which often ends up in spam. Install the free WP Mail SMTP plugin and connect it to Gmail SMTP or Brevo (free tier) for reliable email delivery.
Problem: Menu loads slowly Fix: Compress all food photos before uploading. Use Squoosh.app to convert to WebP format and resize to 800×600px maximum. Uncompressed food photos are the #1 cause of slow restaurant websites.
Problem: Delivery area isn’t restricted correctly Fix: In WooCommerce → Shipping, set up Shipping Zones with specific postcodes or regions. Only customers within those zones will see the delivery option at checkout.
10. Gloria Food vs WooCommerce — Quick Comparison
| Feature | Gloria Food | WooCommerce |
|---|---|---|
| Monthly Cost | Free / Paid tiers | Free (hosting cost only) |
| Commission on Orders | Yes (paid plan to remove) | No (only payment gateway %) |
| Custom Design | Very limited | Full control |
| Own Customer Data | No | Yes |
| Menu Variations | Basic | Advanced (unlimited) |
| Payment Options | Limited | 100+ gateways |
| SEO | Poor (subdomain) | Full control |
| Mobile App for Orders | Yes | Via plugin |
| Delivery Zone Control | Basic | Full postcode control |
11. Final Thoughts
Migrating from Gloria Food to WooCommerce isn’t something you do in an afternoon — but it’s absolutely worth it. Once it’s done, you own your entire ordering system. No platform can change their pricing, shut down features, or limit your customization. Your restaurant’s online presence is yours.
The migration for my Danish restaurant clients took approximately 2–3 days of work per site — one day for setup and menu rebuild, one day for payment and ordering configuration, and one day for DNS, testing, and going live.
If you’re a restaurant owner who wants this done professionally — without the DNS headaches, plugin conflicts, or ordering flow bugs — I’ve done this exact migration multiple times and I’m available for freelance projects.
Get in touch at syedaounraza or WhatsApp directly.